Get started
In about ten minutes, you can sign in to websites as you@your-domain without a password. You need:
- a domain whose records you can edit, or an administrator who can edit them for you
- a computer or phone with a modern browser
No domain of your own?
You can buy a domain in a few minutes and for less than a cup of good coffee, for example at Cloudflare Registrar. Besides triauth, you can use the same domain for personalized email addresses, websites, and more.
If your organization has a domain, ask the person who manages it to add the necessary records. They can also delegate a subdomain to you, for example team.example.com, and you can then use identifiers like john@team.example.com.
What you get
🌐 Own a unique online identifier ensuring a personalized and trusted presence on the web.
🔑 Use it for passwordless, decentralized authentication, to access websites without the hassles of traditional passwords.
🛡️ Gain instant immunity against password fatigue, brute-force, and phishing attacks.
Step 1: Point your domain at an authenticator
Sign in to the DNS panel of your domain and add one TXT record. It tells websites where your authenticator is. To use the authenticator hosted by the triauth project, add:
dns
"triauth auth.triauth.org"This line shows the record the way DNS tools print it. In your DNS panel, you fill in three fields:
| Field | What to enter |
|---|---|
| Name | @, or leave it empty. Both mean the domain itself. |
| Type | TXT |
| Value | triauth auth.triauth.org |
Enter only the text between the quotes as the value. Some panels add the quotes for you, and some show them.
auth.triauth.orgis the address of our hosted authenticator. If you host your own, put its address here.- If you like, you can change the default domain options, such as its mode and delegation policy. See Your domain's record for more information.
Publish only one triauth record per domain. DNS changes can take a few minutes to become visible.
Step 2: Open the authenticator
Open auth.triauth.org or your self-hosted authenticator in the browser you want to sign in from. Accept the terms and start the setup. Type the identifier you want, for example john@example.com. The setup checks that your domain points at this authenticator.
If it reports that the domain is not configured, wait a few minutes and try again. See Troubleshooting if the message stays.
Step 3: Save your lookup code
In private mode, the setup shows a lookup code. It is a 16-character code that finds your records in DNS. Write it down. You may need it to set up the same identifier on another device.
Step 4: Describe this device
Give the device a short name, for example laptop or phone. The name is public, and it helps you recognize the device in your records later.
Choose how you want to authenticate to websites. A browser key is always created. You can also add a passphrase, a security key, or biometrics. See Devices and keys.
Add a public profile if you want. It gets published in the DNS records of your domain, and websites can show your initials and name next to your identifier.
Set an optional private profile. A private profile stays on the device, and you decide per website whether to share it.
Step 5: Publish your records
The setup shows the identity records of this device. They are TXT records that go into the DNS of your domain, in the same panel as in step 1. The setup first asks who manages those records.
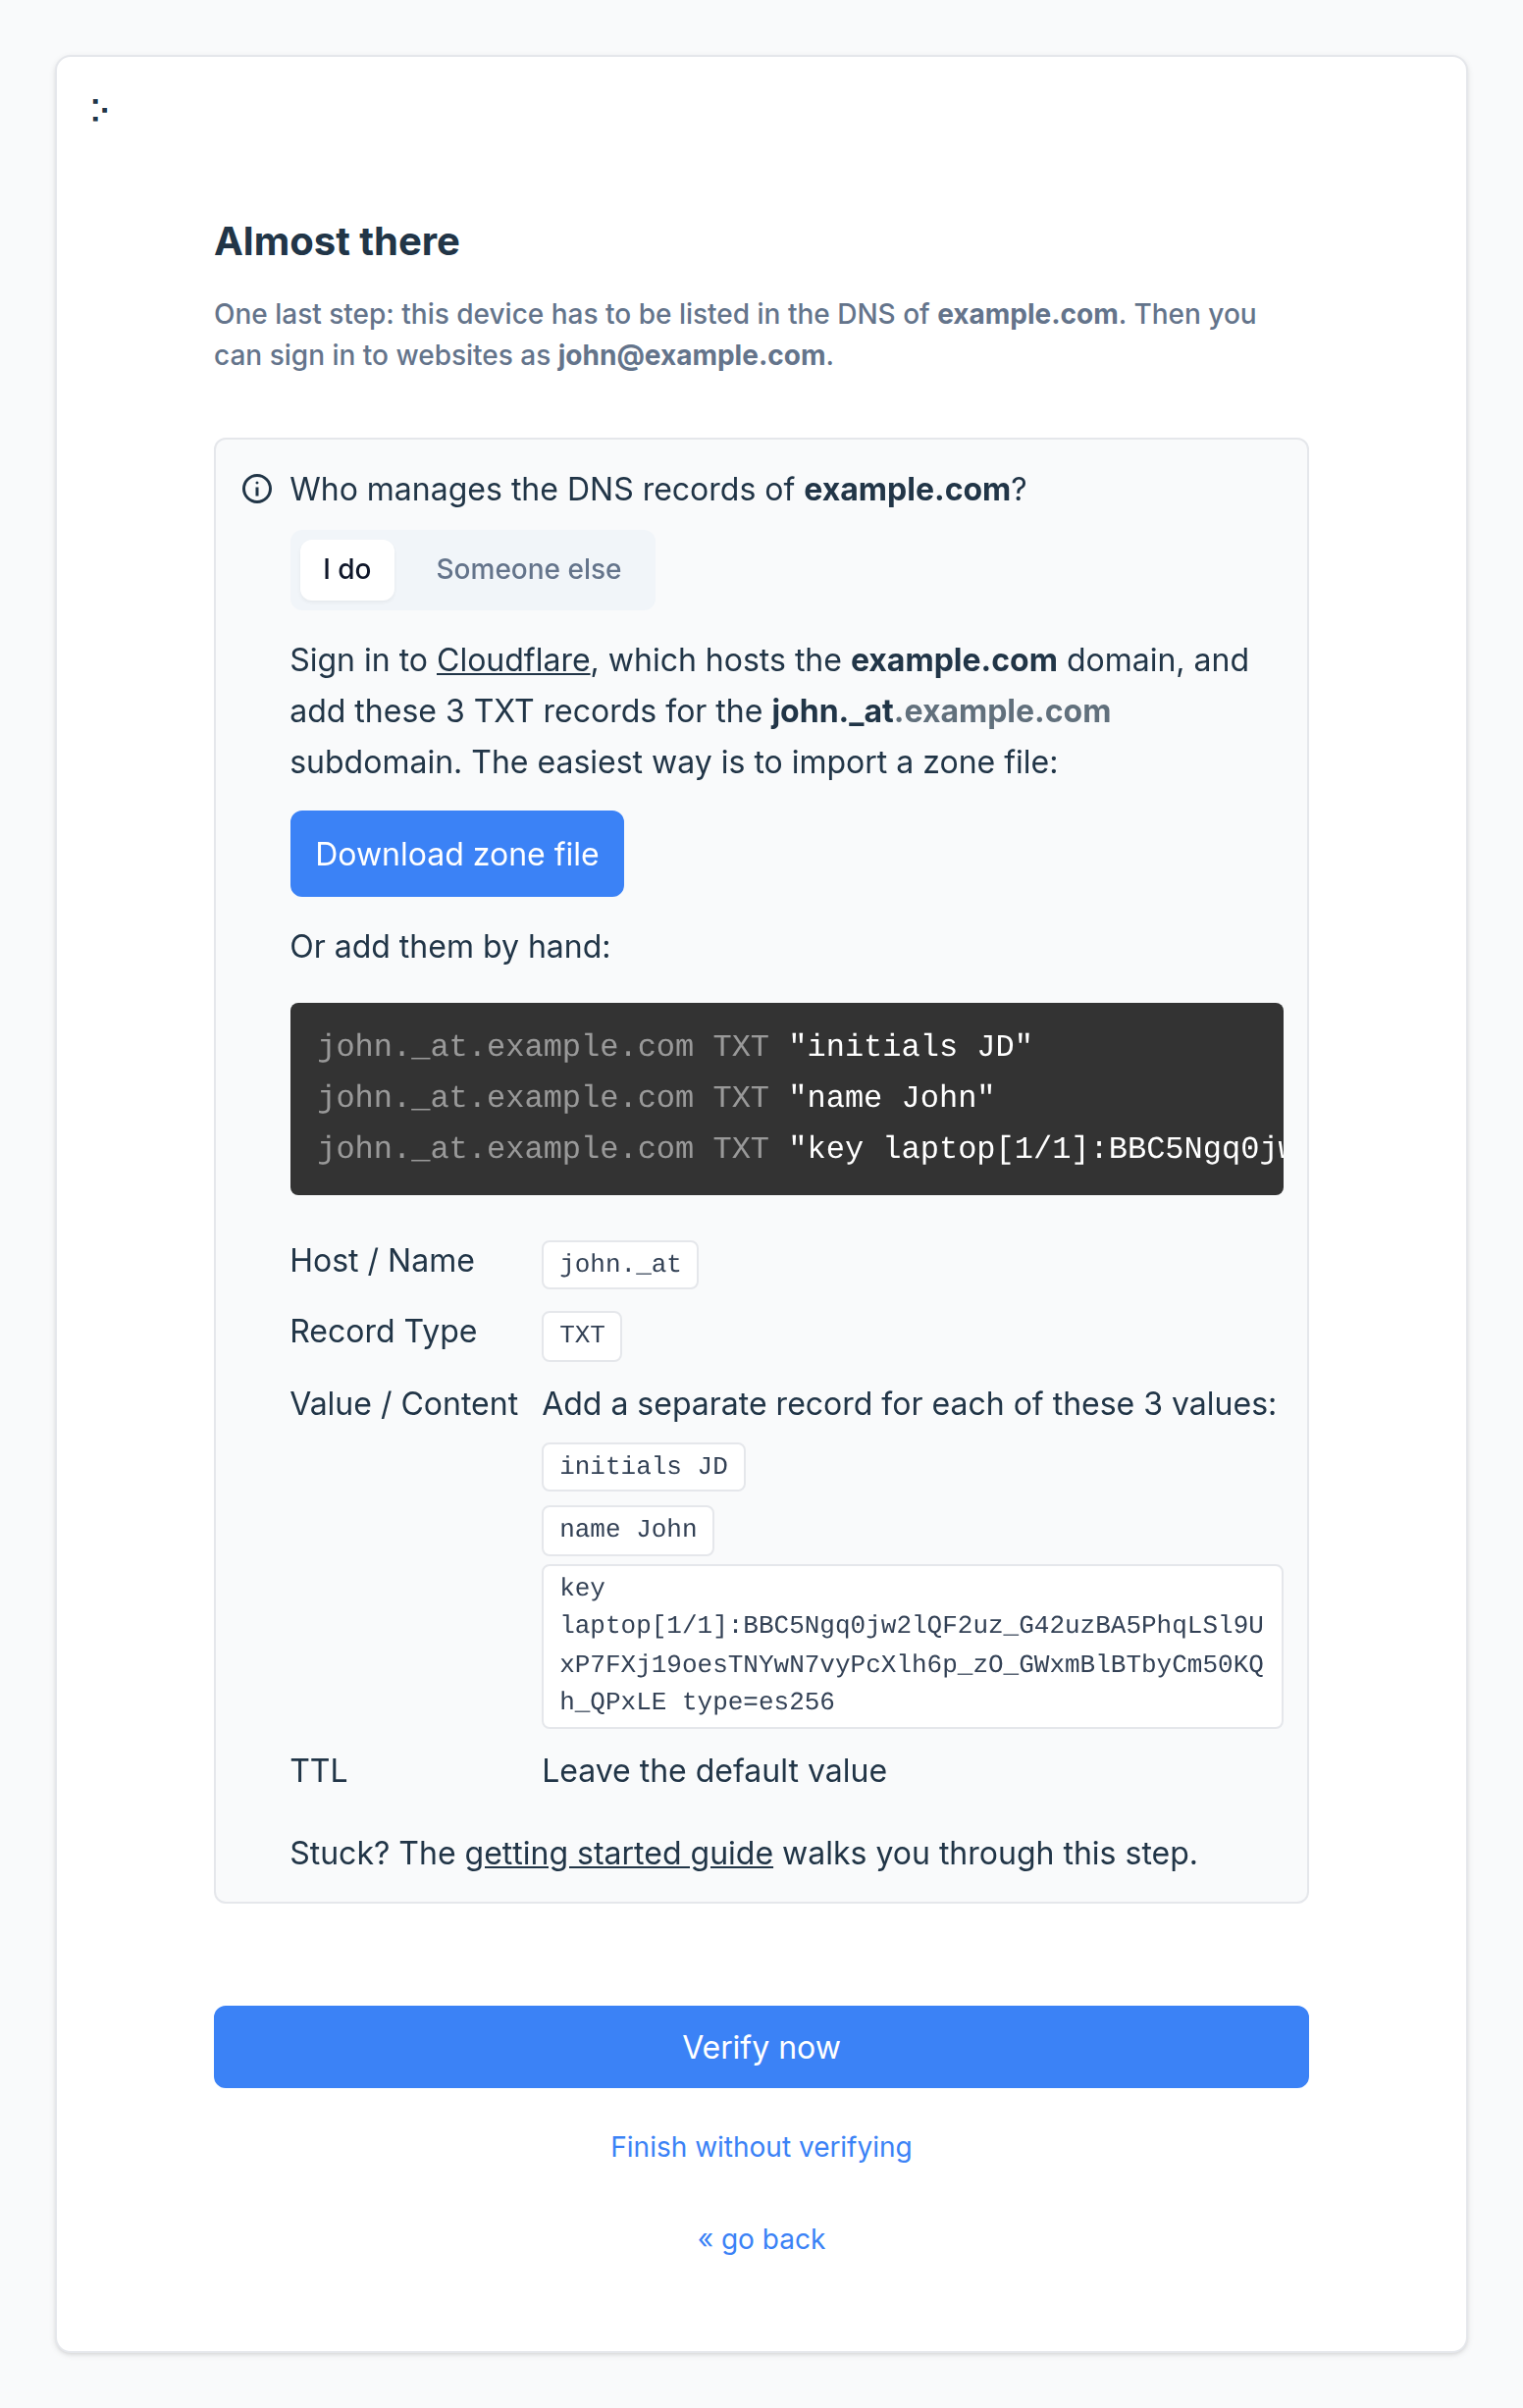
If you manage the records yourself
Choose I do. If the setup recognises your DNS provider, it names it and links to the page of your domain's records there.
The easiest way is to import a zone file. Click Download zone file and import the file in your DNS panel. The setup offers this first at providers that import zone files, such as Cloudflare, GoDaddy, OVHcloud, Amazon Route 53, Hetzner and Hostinger. Look for an import option on the DNS page of your domain. Its name differs per provider, for example "Import zone file" or "Import and export".
If your panel does not import zone files, add the records by hand. The setup shows them as a table with the fields of a DNS panel.
| Field | What to enter |
|---|---|
| Name | The name shown in the setup, for example john._at. A few panels take the full name instead, for example john._at.example.com. |
| Type | TXT |
| Value | One value per record. If the setup lists several values, add one record for each, all with the same name. |
| TTL | Leave the default value. |
Enter only the text between the quotes as the value, as in step 1. Click a value in the setup to copy it.
If someone else manages the records
Choose Someone else. Click Download zone file and forward the file securely to the administrator of your domain or your IT team. The file explains itself. Each line is one TXT record, and a comment at the top says how to import the file or add the records by hand. Then click Finish setup. This device keeps its keys, and you can sign in as soon as the administrator has added the records. See Roll out to your team for the administrator's side.
Verify and finish
Click Verify now. The authenticator reads your DNS through public resolvers and confirms that the records are visible. Then click Finish setup.
If it reports that the records are not visible yet, wait a few minutes and click again. The setup looked up this name before the records existed, so a resolver may still hold the empty answer. See Troubleshooting if the message stays.
Step 6: Sign in somewhere
Your identifier is ready. 🎉
Find a website that supports triauth in Where can I use it?, type your identifier, and approve the request in your authenticator.
Next
- Register a second device, so that a lost device does not lock you out. See Devices and keys.
- Set up identifiers for your whole team. See Roll out to your team.